Lombok, Indonesia | liewwk

completed another Photohunter series – Photohunters : Outing – Lombok, Indonesia | liewwk

for the 5 days outing , we managed to almost round the island and stay near to both famous beaches.. Kuta and Pantai Sengigi for chasing the sun and stars .

Lombok travel
Lombok travel

overall the tips is amazing even we skip the most attractive location – Mount Rinjani.

Overall

1. beautiful beaches around

2. beautiful hotel near Pantai Sengigi and Kuta

3. security overall seem alright with local guide around and thanks Agung for the help and guide

update 2014 Jan 8

– beautiful place with lovely wave that those like to shoot seascape

… following … 1. Lee FIlter GND .75s 2. Lee Filter Pro Glass .9

update 2013 Nov 18

– dusk colors simple awesome even the sunset nothing special

– make use of ND 1.2 and ND .9 to make total 7 stops instead using big stopper

1. Lee Filter GND .9s 2. Lee Filter 1.2 ND 3. Lee Filter .9 ND Pro Glass

update 2013 Nov 8

– we was here for Milky for 2 nights but luck not with us .. but in the morning the Milky “tail” just above the Batu Payung

– a shot capture with Carl Zeiss 15mm F2.8 … the distortion control just awesome

Batu Payung, Tanjung Aan, Lombok, Indonesia

update 2013 Nov 6

– a view that I plan for this trip and the sunset just beautiful with Mount Agung @Bali

1. Singh-Ray RGND 2 stops

######

– a great place that need ~5 min walk from the beach

– when shoot at Batu Payung location, need take note on tide as tide could make the back path

great photographer with Batu Payung


update 2013 Nov 5

– a spot that cost a lot … this spot is close and need to buy drink to have a visit and the price is not at low site

– to come this spot, we need to pass a cliff that without any protection and this place is dangerous and if you visit here … pls stay extra carefull

– my legs were shake after back from the beautiful spot with Mount Agung as backdrop , cliff , wave sunset

… where to stand … 1. Singh-Ray RGND 2 stops 2. Lee Filter 1.2 ND


######################

related posts

liewwk Online Store | liewwk

Lee Filters And Singh-Ray filtes for sale

what CPL effect you prefer ? …

I use FLM tripod

me ….. liewwk in action ….

let’s start share some of my profile pictures 😀

update 2012 Oct 10

liewwk in action 2011 Aug @Kemasik Beach

update 2 Jul 2012

liewwk in action

me in action 2012 Feb @Semporna, Sabah


update 18 June 2012


– start with a blur one .. 2012 May … Batu Bapah with Mok … 20s stad still failed 😀

How I shoot Landscape – black card method (use finger)

I actually want to share this “black card” quite some time ago .. but I always forget and not really able to get some good result to share … and while I am doing this , one of my gang actually notice me shaking my finger around the front len .. and she did ask what was I doing … 😀 and here you go ….

what is black card method and when will we use it ?

when we having different exposures, I normally do GND filter, exposures blending, black card, HDR …(we not going to discuss all here but share some sample)


A. GND filter

this is just like GND filter, most of the time we have big dynamic range/different between sky and foreground.. it normally have different from 2-9 stops …. e.g. for standard sunrise/sunset/magic hour environment, we face 2-4 stops different between foreground – sky… to resolve this we normally use GND to single frame picture have the correct exposure among foreground and sky e.g.

1. without GND

Magical moment - no GND

2. GND

... the magical moment ...

– the sky is ~4 stops different from the foreground…

– I use GND.9s for above picture and do some PP trick to make the right exposure


B. HDR (seldom do this …but think we still good to know this)

Cold Reflection

– why I choose HDR … this was shoot use my SIGMA12-24mm which cannot fit any filter

– it was too cold to think which method to choose so I simply shoot 7 exposures back 😀


3. black card

– seldom use this as I am not really experience

– filter much easy

– need a lot of try and error but the good light could be disappear any time

original shot without any filter, blending, black card

– why I choose black card, the environment was dark, not sure how/where to apply GND

– multiple exposures will take double or even more times for single shot

– the exposure different >3 stops

for me I know the area that make me concern as below

the over expose portion

– so what I did was, use my fingers block the over expose area

– allow only ~2-3 seconds exposure over 30 seconds exposure, so I block it until last few seconds and I remove my finger


so I get

... another milky way ...


most of the time we just need try and error, where some fail sample .. think only expose for ~1s

wrong timing to shake the black card/finger

I will discuss more on other method in future … but let’s try and error on black card 😀


Milky Way again…

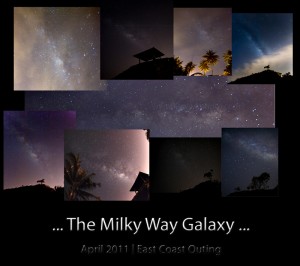
this is not first time I shoot Milky, but this is my very first time see it clearly … it was just above us and we can use our eye to see it … am happy able to make this outing [my East Coast visit | April 20100] and thanks for my friends going with me (Shunfa, Jason, Siah, Seesy, Xiao Yi, Ismail, Norhana & Lio) . We had wonderful trip … and could be most memorable trip for me ….

My very 1st Milky was post before here

and here was picture capture few steps out from the homestay …

Simply look up … the Milky Way

5dm2 + SIGMA24F1.8

# Exposure Time (1 / Shutter Speed) = 10/1 second ===> 10 second
# Lens F-Number / F-Stop = 18/10 ===> ƒ/1.8
# ISO Speed Ratings = 1600

how to capture this, simply same how I shoot stars which I share before here… except we need higher ISO to get it clearly ……….

Update later

… Milky Way …


my East Coast visit | April 2011

since last year July till now, I had travel to Malaysia East coast for 4-5 times but it never slow me down to make another visit but it rather make me feel I should visit there more often as a Landscape photographer .. it is a “heaven”, I would say I only explore <5% location up to Kuala Terengganu from Kuantan…. 31 March – 4 April 2011, me with other 8 friends decided to make a quick trip from Kuantan –> Pantai Kemasik (sunrise) –> Kuala Terengganu (Pantai Pandak & Masjid Tengku Tengah Zaharah) –> Kota Bahru (meeting www.photomalaysia.com event, Sri Tujuh…) –> Dungun (star, sunrise ….)


short 5d4n trip, we traveled ~1500KM, managed to capture beautiful sunrise, sunset, reflection, stars …. and Milky way from 2 places …

it going to be slow to share all pictures .. but let’s start this thread and I will be slowly post up the pictures into Terengganu series.

but let’s me start with 1st capture at Pantai Kemasik …

... under the Starry sky ...

and another after sunrise shot before we continue our journey …

... different interest ...


stay tune for more update pictures from beautiful East Coast, Malaysia


Update 6 April 2011 – everyone seem success capture the Milky way … congraz …

Milky Way by everyone in the trip
Update 9 April2011
Morning Wave at Pantai Kemasik