How I shoot Landscape – black card method (use finger)

I actually want to share this “black card” quite some time ago .. but I always forget and not really able to get some good result to share … and while I am doing this , one of my gang actually notice me shaking my finger around the front len .. and she did ask what was I doing … 😀 and here you go ….

what is black card method and when will we use it ?

when we having different exposures, I normally do GND filter, exposures blending, black card, HDR …(we not going to discuss all here but share some sample)


A. GND filter

this is just like GND filter, most of the time we have big dynamic range/different between sky and foreground.. it normally have different from 2-9 stops …. e.g. for standard sunrise/sunset/magic hour environment, we face 2-4 stops different between foreground – sky… to resolve this we normally use GND to single frame picture have the correct exposure among foreground and sky e.g.

1. without GND

Magical moment - no GND

2. GND

... the magical moment ...

– the sky is ~4 stops different from the foreground…

– I use GND.9s for above picture and do some PP trick to make the right exposure


B. HDR (seldom do this …but think we still good to know this)

Cold Reflection

– why I choose HDR … this was shoot use my SIGMA12-24mm which cannot fit any filter

– it was too cold to think which method to choose so I simply shoot 7 exposures back 😀


3. black card

– seldom use this as I am not really experience

– filter much easy

– need a lot of try and error but the good light could be disappear any time

original shot without any filter, blending, black card

– why I choose black card, the environment was dark, not sure how/where to apply GND

– multiple exposures will take double or even more times for single shot

– the exposure different >3 stops

for me I know the area that make me concern as below

the over expose portion

– so what I did was, use my fingers block the over expose area

– allow only ~2-3 seconds exposure over 30 seconds exposure, so I block it until last few seconds and I remove my finger


so I get

... another milky way ...


most of the time we just need try and error, where some fail sample .. think only expose for ~1s

wrong timing to shake the black card/finger

I will discuss more on other method in future … but let’s try and error on black card 😀


Milky Way again…

this is not first time I shoot Milky, but this is my very first time see it clearly … it was just above us and we can use our eye to see it … am happy able to make this outing [my East Coast visit | April 20100] and thanks for my friends going with me (Shunfa, Jason, Siah, Seesy, Xiao Yi, Ismail, Norhana & Lio) . We had wonderful trip … and could be most memorable trip for me ….

My very 1st Milky was post before here

and here was picture capture few steps out from the homestay …

Simply look up … the Milky Way

5dm2 + SIGMA24F1.8

# Exposure Time (1 / Shutter Speed) = 10/1 second ===> 10 second
# Lens F-Number / F-Stop = 18/10 ===> ƒ/1.8
# ISO Speed Ratings = 1600

how to capture this, simply same how I shoot stars which I share before here… except we need higher ISO to get it clearly ……….

Update later

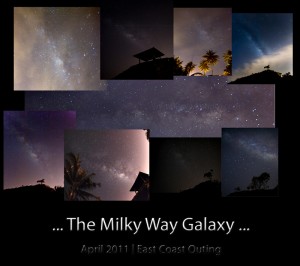
… Milky Way …


my East Coast visit | April 2011

since last year July till now, I had travel to Malaysia East coast for 4-5 times but it never slow me down to make another visit but it rather make me feel I should visit there more often as a Landscape photographer .. it is a “heaven”, I would say I only explore <5% location up to Kuala Terengganu from Kuantan…. 31 March – 4 April 2011, me with other 8 friends decided to make a quick trip from Kuantan –> Pantai Kemasik (sunrise) –> Kuala Terengganu (Pantai Pandak & Masjid Tengku Tengah Zaharah) –> Kota Bahru (meeting www.photomalaysia.com event, Sri Tujuh…) –> Dungun (star, sunrise ….)


short 5d4n trip, we traveled ~1500KM, managed to capture beautiful sunrise, sunset, reflection, stars …. and Milky way from 2 places …

it going to be slow to share all pictures .. but let’s start this thread and I will be slowly post up the pictures into Terengganu series.

but let’s me start with 1st capture at Pantai Kemasik …

... under the Starry sky ...

and another after sunrise shot before we continue our journey …

... different interest ...


stay tune for more update pictures from beautiful East Coast, Malaysia


Update 6 April 2011 – everyone seem success capture the Milky way … congraz …

Milky Way by everyone in the trip
Update 9 April2011
Morning Wave at Pantai Kemasik

some of my Nightscape/Stars collections

Me and my gang was crazy with nightscape with stars since last year but too bad year end is not a good season for stars photography due to weather … so we stop for months and now we are back with full actions where we are thinking, dreaming of stars every moment .. and we also try to plan as much as possible stars chasing outing 😀

some of my stars pictures

1. my very 1st “plan” star shooting

… Galaxias | the milky way …

2. star trail from USA

… a cold Startrails …

– still time elapse for the stars movent

http://www.flickr.com/photos/liewwk/4598121297/

3. while waiting for the sunrise

… another waiting moment …


4. waiting for sunrise also

… the Star still Shines …


5. my 1st Milky way

… the Milky way …


6. … the Dawn full with Stars …

… the Dawn full with Stars …

More Nightscape and Stars pictures

http://www.flickr.com/photos/liewwk/sets/72157625783040852/

and have share how I shoot stars


My 1st Milky Way …

it is not a dream, we able to shoot the Milky way at not really too dark area … it was my dream to chase it 2010 but some how I failed to make it … but 2011 me and my few close friends (shunfa, Lio, Jason … SP …. Mingkai) have start our crazy chasing project where we travel  ~400km (return) 3 times in a week …. even we try to make it coming weekend but due to the some security issue at the location so we decided to cancel our trip there ….

one of the failure Milky chase

My friend – Shunfa was so happy while he 1st got it with him 30mm F1.4 … and too bad what I have much obvious compare to what he has, not matter what setting I use (high ISO, long exposure, ISO NR, LE NR … ) but my F2.8 lenses still cannot get any clearer Milky as compare that 30mm F1.4 got … hmmmm so the conclusion is under not so dark place. it is always good to use bigger aperture lenses to have more stars, brighter stars (so thicker star trail) and more objects (Milky way) …

the Milky way

let’s me share my setting and some PP done on this

Canon 5dm2 + Canon 15mm F2.8 + tripod for sure
# Exposure Time (1 / Shutter Speed) = 43/1 second ===> 43 second
# Lens F-Number / F-Stop = 28/10 ===> ƒ/2.8
# ISO Speed Ratings = 500
– no Manipulation  done ..
– crop both site to make square look (no crop on top and bottom)
– some dodge and burn on the sky

and previous share How I shoot Stars..